Builder Onboarding Flow
Builder onboarding turns a new PoolPM account into a usable builder operating workspace. Each step collects information that is used later by DispatchIQ, CascadeIQ, procurement, financials, homeowner communication, service, and executive reporting.
Do not treat onboarding as a formality. The better the setup data is, the more useful the portal becomes on the first day.
Before you start
Have these items ready before opening onboarding:
- Legal business name, trade name, EIN or tax ID, business type, license number, operating states, office address, primary phone, business email, website, timezone, and logo.
- The pool types you build: gunite or shotcrete, fiberglass, and/or vinyl liner.
- Core material vendors and supplier contacts.
- Subcontractor list, trade coverage, phone numbers, compliance status, and default phase ownership.
- Preferred payment defaults, markup defaults, tax rate, contingency, and change order threshold.
- Typical annual pool volume, build duration, material lead times, checklist expectations, and inspection gates.
- Notification phone numbers, emails, lead alert channels, call routing numbers, and required launch acknowledgments.
- Existing contract or SOW template if you want PoolPM to index real contract language during setup.
Step 1: Company Profile
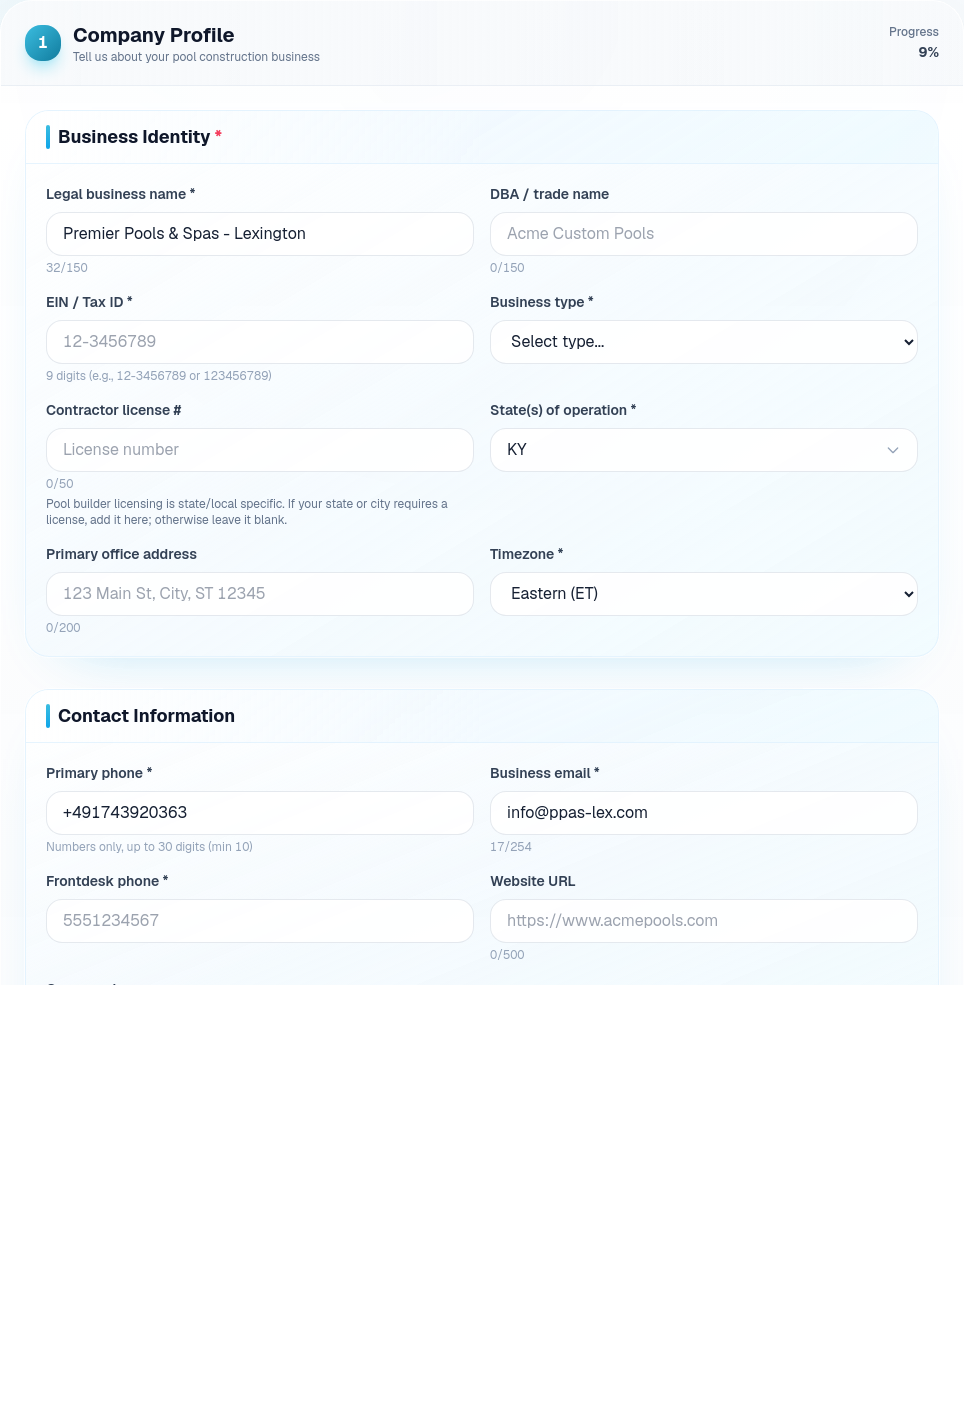
The Company Profile step gives PoolPM the official identity of the builder business. This is the foundation for account approval, customer-facing communication, document generation, timezone-aware scheduling, and builder-specific defaults.
Fill out the Business Identity section first:
- Legal business name should match the company name used on tax, insurance, license, and contract documents.
- DBA / trade name is the public-facing brand name if it differs from the legal entity.
- EIN / Tax ID should be entered without extra labels. Use the exact identifier the business uses for finance and tax workflows.
- Business type tells PoolPM how to classify the company entity, such as LLC, S-Corp, C-Corp, sole proprietorship, or partnership.
- Contractor license # should be the primary license used for pool construction in the selected operating state. If the state requires a license, onboarding expects this to be filled in.
- State(s) of operation should include every state where the builder actively sells or builds pools.
- Primary office address should be the main business address, not a temporary jobsite.
- Timezone should match the office timezone that controls schedule defaults and customer communication timing.
Complete Contact Information with the business phone, business email, frontdesk phone, website, and logo. These values help route homeowner, vendor, and internal communication to the right place.
Select the pool types you build carefully. CascadeIQ and project defaults use these selections to seed the right phase logic, checklist templates, and scheduling assumptions. Choose every type the company actually builds, not only the most common one.
Step 2: Team Members
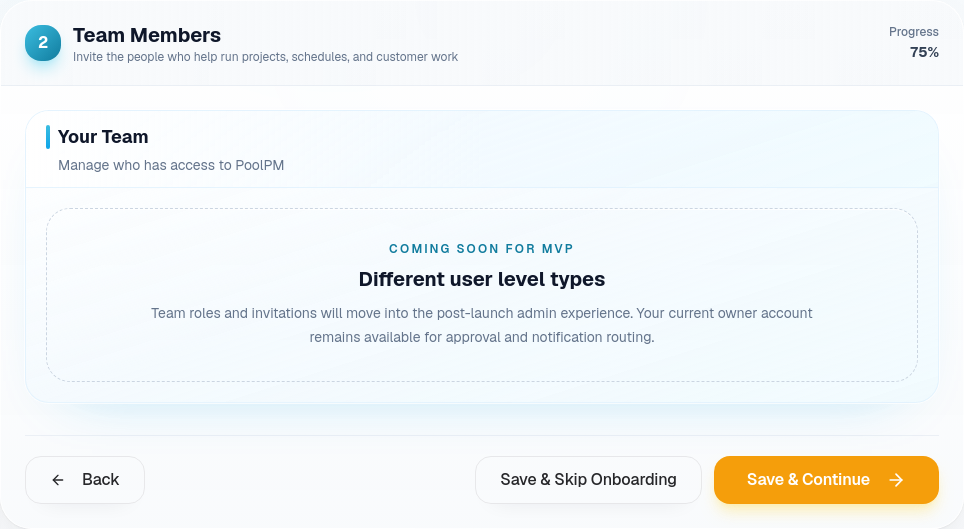
The Team Members step defines who can participate in PoolPM. In the current MVP, additional user-level team invitations are marked as coming soon, so there is nothing required to complete here.
Use this step as a checkpoint:
- Confirm the account owner is the correct person to receive approval, onboarding, and notification routing.
- Plan which team members will eventually need access: owner, admin, project manager, scheduler, sales, accounting, field supervisor, customer service, and office staff.
- Decide which roles should be allowed to approve schedule moves, payment actions, subcontractor assignments, vendor changes, and customer-facing communication.
When multi-user invitations are enabled, this step should be filled with real work ownership in mind, not just a list of employees. PoolPM works best when responsibility is explicit.
Step 3: Material Vendors

The Material Vendors step gives PoolPM the suppliers that matter to construction and procurement. These vendors are used later for procurement views, purchase order readiness, delivery lead-time assumptions, and material pricing context.
Add the vendors the builder uses most often first:
- Pool distributors such as PoolCorp or Heritage Pool.
- Concrete or shotcrete suppliers.
- Equipment vendors for pumps, heaters, filters, automation, and sanitation.
- Tile, coping, decking, paver, stone, plumbing, electrical, and specialty suppliers.
For each vendor, enter the company name, category, material categories, contact details, and typical delivery timing when available. If a vendor is the default supplier for a category, mark that clearly. Default vendors help PoolPM make better assumptions when a new job is created or a material workflow needs a supplier.
Use the quick-add buttons only when they match the builder's real supplier list. Otherwise, add the vendor manually so procurement data starts accurate.
Step 4: Subcontractors

The Subcontractors step gives PoolPM the trade partners that perform field work. CascadeIQ uses this information to understand who can own a construction phase, where compliance may block assignment, and how schedule planning should route work.
Start in Subcontractor List:
- Add each subcontractor company used for excavation, steel, plumbing, electrical, gunite or shotcrete, tile, coping, decking, plaster, cleanup, automation, and specialty trades.
- Enter the primary contact and phone number so DispatchIQ and the project team can route work and follow-up.
- Assign the correct trade. Trade classification is important because it determines where the subcontractor can appear in phase planning.
- Track compliance documents such as COI, license, and W-9. Missing or expired compliance should be treated as operational risk.
- Mark whether a subcontractor supplies its own materials when that affects procurement responsibility.
Then review Phase Assignments. This is where the builder can connect normal construction phases to default subcontractors. The goal is not to lock every future job into one path. The goal is to give PoolPM a realistic starting point so scheduling and handoffs are not blank.
If a subcontractor appears to duplicate an existing record, resolve the duplicate warning before continuing. Duplicate trade partners make scheduling and compliance data harder to trust.
Step 5: Financial Setup
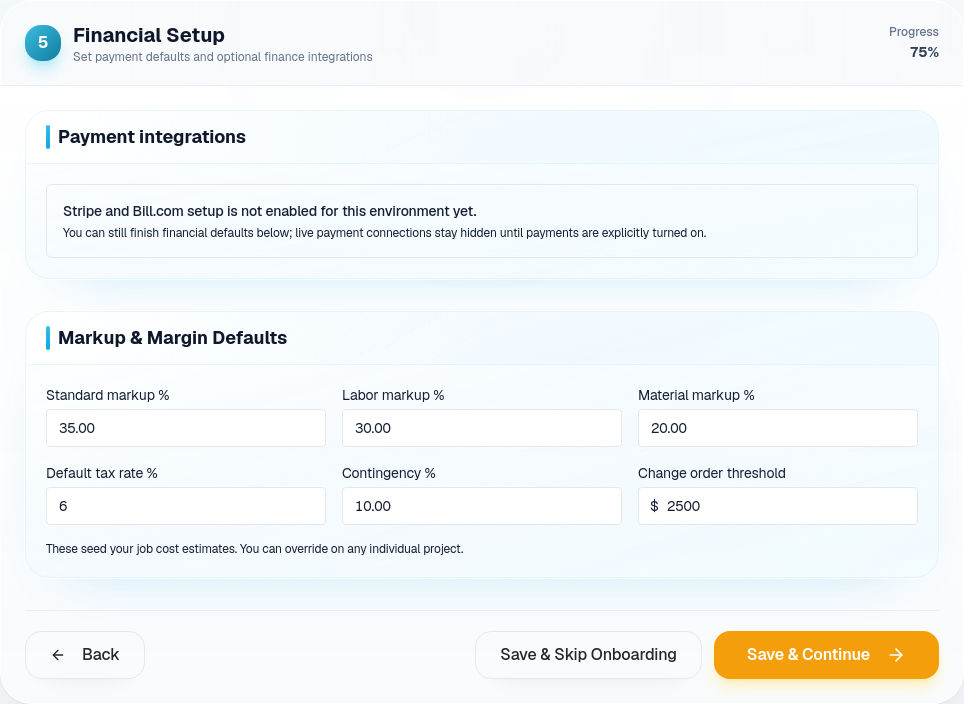
The Financial Setup step prepares PoolPM for payment workflows and margin defaults. Payment integrations may be optional or hidden depending on the environment, but markup defaults should still be reviewed.
If payment integrations are available:
- Stripe Connect is used to receive homeowner payments. Builders should be ready with EIN or tax ID, bank routing and account details, owner date of birth, and SSN last four when Stripe onboarding is active.
- Bill.com is intended for paying subcontractors and vendors. When enabled, it helps automate outgoing payment workflows while keeping approvals visible.
Review Markup & Margin Defaults:
- Standard markup % is the normal markup applied across work when no more specific rule exists.
- Labor markup % applies to labor-driven items.
- Material markup % applies to material-driven items.
- Default tax rate % should match the builder's normal tax assumption for applicable work.
- Contingency % gives estimates and job planning a default buffer.
- Change order threshold defines the dollar amount where a change should receive stronger attention or approval.
Enter defaults conservatively. These values should reflect how the builder actually prices work today, not aspirational future margins.
Step 6: Project Defaults

Project Defaults are where PoolPM learns the builder's normal operating assumptions. CascadeIQ and the portal use these values until actual job, purchase order, and schedule data can refine them.
Start with Your Typical Pool Build:
- Annual pool target helps calibrate business scale, pricing tier expectations, and scheduling estimates.
- Average build duration should reflect the normal signed-to-completion timeline for a typical pool, not the fastest possible build.
Then fill out Material Lead Times. These are initial estimates for how many days usually pass between order and delivery for important categories such as concrete, equipment, coping, plumbing, electrical, decking, rebar, pavers, stone veneer, and special orders.
Use practical values:
- If a supplier usually delivers in one week, enter a number near that real cadence.
- If special orders regularly create schedule risk, do not hide that risk with an optimistic number.
- If lead times vary by season, enter the value that best protects the schedule during normal workload.
Review Phase checklist and inspection items next. These templates seed quality and readiness checks by pool type and construction phase. Use the pool-type tabs to review gunite, fiberglass, and vinyl defaults. Keep active the checklist rows that the builder truly wants the team to verify, and disable or edit rows that do not match the builder's process.
Finally, set Homeowner Portal Behavior:
- Enable the homeowner portal for new projects only if the builder is ready for homeowners to receive portal visibility.
- Show conservative schedules when the builder wants homeowner-facing timelines to avoid overpromising.
- Use the sigma multiplier to control how conservative schedule projections should be.
This step is the bridge between onboarding and real project execution.
Step 7: Notifications
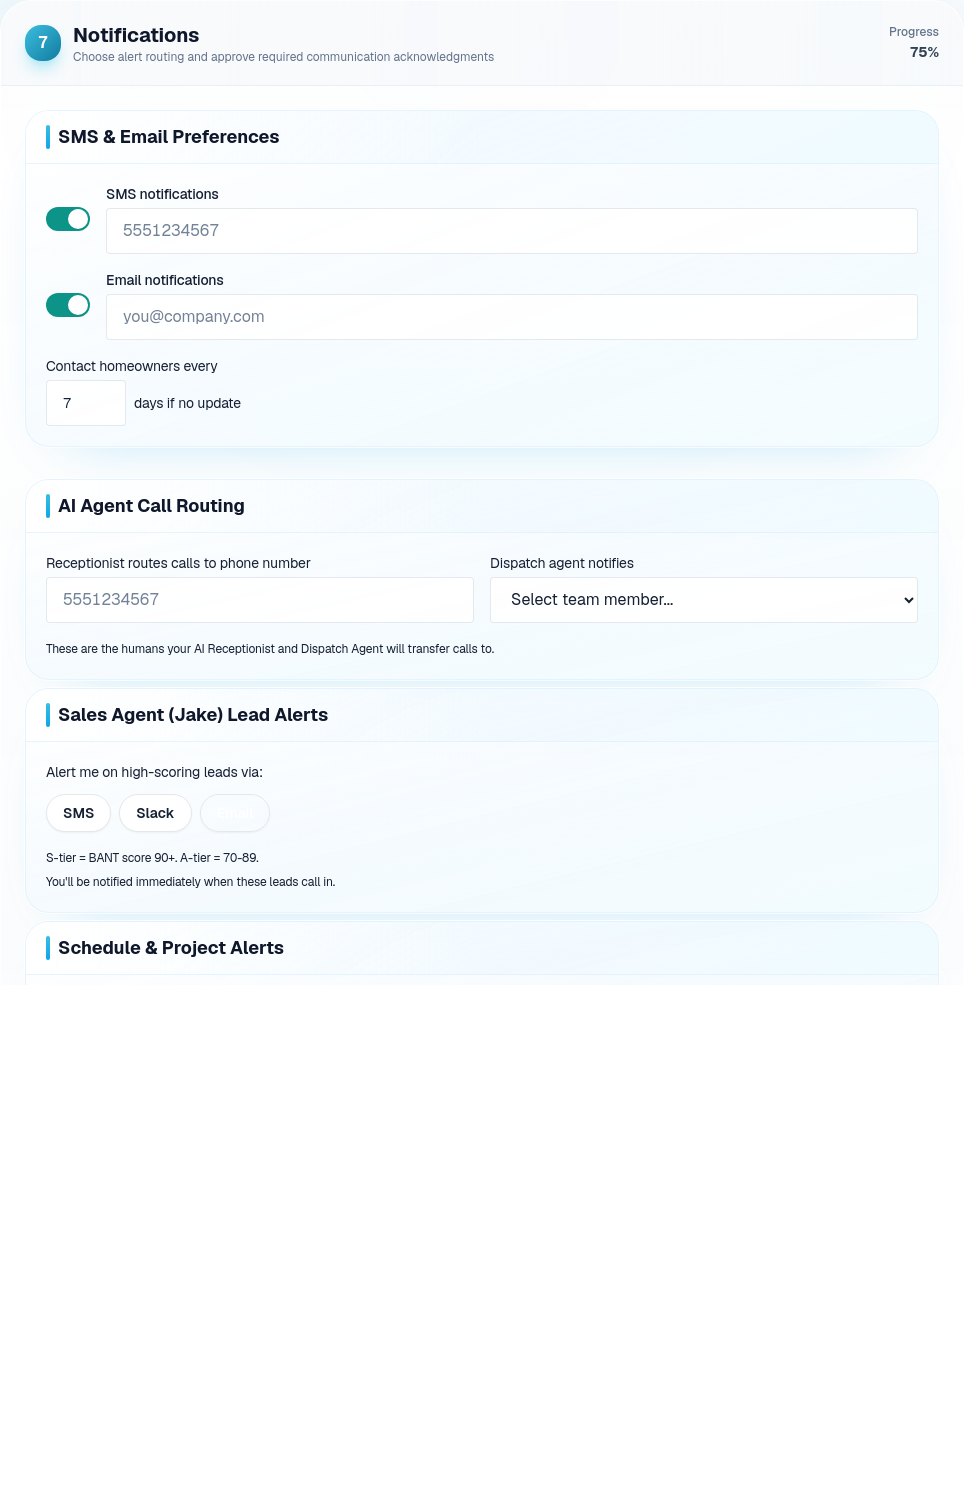
Notifications decide how PoolPM communicates with the builder, team, and AI-assisted workflows.
Complete SMS & Email Preferences:
- Turn on SMS only for a phone number that should receive operational notifications.
- Turn on email only for an address that is monitored.
- Set the homeowner contact interval to match the builder's communication standard.
Configure AI Agent Call Routing:
- Receptionist routes calls to phone number should be a real number that can handle inbound calls or escalation.
- Dispatch agent notifies should point to the person responsible for operational follow-up when team routing is available.
Review Sales Agent lead alerts:
- Select the channels that should receive high-scoring lead alerts: SMS, Slack, and/or email.
- Use Slack only if the destination is monitored.
- Use SMS for urgent lead response when speed matters.
- Lead tiers help separate S-tier and A-tier opportunities from lower-priority work.
Review Schedule & Project Alerts for delays, PO delivery changes, and subcontractor compliance expiration. These alerts are there to catch problems before they become job delays.
The Required before launch section is mandatory. A builder must acknowledge recording and AI-agent disclosure, agree to the Terms of Service, and agree to the Data Usage & Processing Agreement before launching the dashboard.
Step 8: Contract Upload
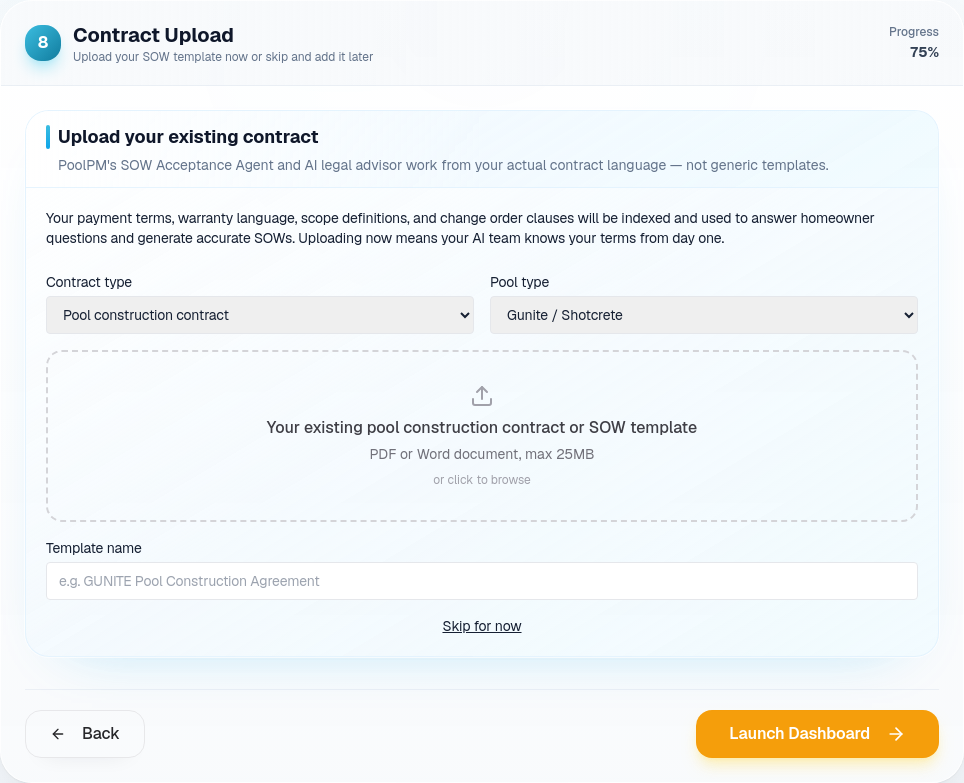
The Contract Upload step is optional during onboarding, but it is valuable when the builder wants PoolPM to understand real SOW and contract language immediately.
Upload the existing contract or SOW template when available:
- Choose the contract type, such as pool construction contract, remodel contract, or service agreement.
- Choose the pool type for SOW, such as gunite or shotcrete, fiberglass, or vinyl liner.
- Upload a PDF or DOCX file up to the stated file limit.
- Give the template a clear name, such as "Gunite Pool Construction Agreement."
PoolPM uses this document language to support SOW acceptance, contract-aware homeowner answers, payment term context, warranty language, scope definitions, and change order clauses.
If the contract is not ready, use Skip for now and upload it later from the document settings area. Skipping the upload should not be used to avoid contract cleanup forever; it simply keeps onboarding moving when the file is not available.
Launch checklist
Before clicking Launch Dashboard, confirm:
- Company identity and contact data are accurate.
- Pool types match the builder's real work.
- Core vendors and subcontractors are entered.
- Financial defaults reflect current pricing practice.
- Lead times and build durations are realistic.
- Checklist templates and inspection gates match the builder's field process.
- Notification destinations are monitored.
- Required launch acknowledgments are checked.
- Contract upload is completed or intentionally skipped.
When onboarding is complete, the builder should be able to open PoolPM and immediately understand what needs attention, which work is blocked, who owns each next action, and where the business needs leadership review.